A great article today as we deep dive into more on training at the High School level. I am honored to have Coach Shumate share his knowledge with us. Coach Shumate is so willing to share information and give back. Please reach out to him with any questions. Thanks Coach
Our ultimate goal in strength and conditioning and sports performance is to optimize our athletes. The methods, programming, and details of getting there vary. Greatly. Because ultimately we have to optimize our athletes based on the realities of our situations. Situations of equipment, facilities, session duration, training ages, the list goes on. All of these factors determine how our program runs. My goal is to provide you some methods that may work for you. Providing some of my personal story helps to provide context on the development of my methods and recommendations.
The year I got medically disqualified, Rick Court had been hired as the new director of S&C for Football. At the beginning of my early life crisis Coach Court allowed me to be an assistant with his staff. He launched my love and passion for coaching in Strength and Conditioning and it has been quite the journey since.
Over the next few years, I transitioned away from the college level. I worked in the private sector, with small colleges, and the USOC. During this time I began work on my teaching credential and masters. Fast forward a few years and my wife and I are moving to a new city. I land a job teaching middle school PE and S&C at the high school. At no point in my life did I have a desire to work with middle school students or even high schoolers. But over the next few years, I went through a refining process to become the coach I am today and I wouldn’t trade it for the world. My approach, my communication, my coolheadedness all vastly changed from working with adults. Along with this my philosophy changed. Ultimately the goal of optimizing performance is the same, but the connections and communication needed to achieve this are a whole different ball game.
My philosophy developed into the following:
Simplify the usage of the weight room to make it effective and efficient for the development of
students/athletes.
Simplify can have a negative context. Your first thought maybe there is nothing simple about the weight room. But I mean exactly what the definition says, “make it easier to understand.” Ease of understanding leads to success. Success leads to improvement and buy-in. That’s the game, my friends. Here are a few lessons I learned.
Lesson 1: What’s the flow of your weight room?
Unless you have been blessed with the budget or grant to design or redesign your weight room, it is probably set up the way you found it. And that setup may be based on absolutely nothing you can justify. Have you thought about why it is the way it is, other than the thought of moving everything around sounds terrible?
It may seem like a monumental task for some to rearrange and find what works best, but there is a reason I am talking about this first. The goal is to create flow and doing so in a cyclical rotation makes it work well. In doing so we can utilize space much more effectively, limit wait times, and increase workload. Most training sessions in middle our high school are going to involve large groups, short durations of time and several start times. These are factors you cannot necessarily change or control. But we can make sure the flow or the workout rotation maximizes the time and equipment we do have to get the most amount of work done we can.
Create a layout using Google Draw or Sheets. It doesn’t need to be to scale it just needs to help you visualize the room. Then take yourself through the workout. When I get off the bar from squats where am I headed next? Are you crossing all over the room or are you flowing from one station to the next? Is it clear where to go or is it a Where’s Waldo Weight Room addition?
As I mentioned I recommend a cyclical flow so moving clockwise or counterclockwise I end up back where I started. That can be in rounds or it can be all in the same set (see image 1). As to how you can get the equipment moved around easier? Invite a team or 3, assign them a station to move set up. Put tape markers on the ground. Have them clean the equipment from the ground to the ceiling. Then pay them in pizza. I’ve never had an issue getting students to invest in their own weight room.

Lesson 2: Choosing your exercise selection for your program
This is not a debate on my favorite exercises or why I do what I do. This is purely based on taking an inventory of exercises you utilize efficiently based on your training area, equipment, group size, and group experience. Once you have done this you can adapt, grow and justify new selections but initially let’s simplify.
Take an inventory of exercises you can perform. You can only do what you can do. But also what is it you want to focus on or progress through. Create a list of your major equipment. What do we want to test and focus and build? Then decide 3 major categories of lifts. Let’s say upper, lower, and core. What are at least 3 exercises in each accessory category I want to focus on? Your choices can be because of comfort/expertise, training goals, philosophy...whatever.
What can be done? (Equipment and Space) Barbells, Racks, Platforms, Bumpers, Kettlebells, Cables
Choose your Compound Lifts (2-4) Bench & Squat… Bench, Deads, Squat... Bench, Cleans, Deads, Squats
Choose your Accessory Lifts (3-6 of each)
Now that we have made a simple and solid list we can start to create our exercise selection library. Progress/Regress your compound or my main lifts first. Doing so will build your exercise library in a way that trains essential patterns for the athletes but also adds new challenges for more adaptations. It will expand your Exercise Library and also can help to guide your Annual Planning. For example, let’s say I spend 2-3 weeks at each level. We’re building the technique and progressing the load and challenge from one level to the next all the while progressing the focus on the 3 main lifts Squat, Bench, and Cleans (see image 2).

Now do the same for the accessory lifts. Establish 3-4 exercises for each category. Create variations of them so you have A rounds and B rounds for differentiation (see image 3). A lot of times that can be just switching from bilateral or both sides to unilateral (one side). But again we are building on established patterns and providing enough variation to get some new adaptations. These have expanded my Exercise Library and also can help to guide my Annual Planning by creating different blocks or phases.

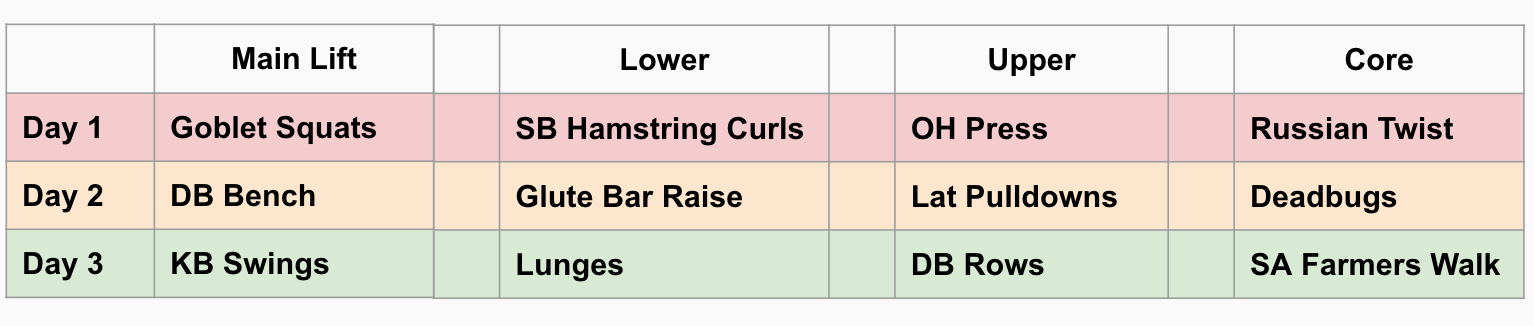
So just putting it all together it could look something like this (see image 4). I combined my level 2 compounds with my A series of accessories to form a 3-day plan. We can spend 2-3 weeks here then progress to Level 3 of compounds and alternate to B series of accessories.
Lesson 3: Utilize Technology
Technology has exploded onto the scene of S&C specifically in terms of Programming and Data Capture. There are tons of things to pay for and they may or may not be helpful and do great things for your program. I’m not here to speak for or against any of them. We’re going to look at some simple and free implementations.
We don’t pass out individual papers. Storing, tracking, printing is tedious. I choose to track certain metrics and others are on the kids to just decide. They need to decide relevant weights for accessory lifts and develop the ability to determine how much they should use based on the prescribed volume for the day.
Instead, I cast to TVs or project the list. The only printing I do is for some groups or teams I will post groups with relevant weights/percentages. Otherwise, everything is up on the screen and they follow the lift as listed and reference the maxes/percentages as needed (see image 5).

One of the biggest changes we made was using GIFs. They have been groundbreaking in the intro and demonstrating exercises. They are faster than videos or self demonstration and loop continuously. I don’t use them to teach exercises, but they are there to remind the kids as needed. So many times when a student asks what is “whatever exercise” glute bridge, for example, our response is to give them an A-Z explanation and they may only need a fraction of what you throw at them. The demo eliminates so much of this and allows me to get back to the coaching technique instead of just reminding what an exercise is.
You can turn any youtube video into a GIF. Find the video you want, go to address bar, insert gif after the period, so www.youtube becomes www.gifyoutube. Then edit it down to the gif you want. You can access my library of over 100 exercise GIFs here: https://drive.google.com/drive/folders/1unHLHwO2qX0fvlfVx1MtSH7z0y5JzRTv?usp=sharing
It all comes down to building relationships and communicating well with our athletes. Whether you’re working with kids or adults I strongly believe that simplifying the usage of the weight room will increase your effectiveness and efficiency in turn optimizing your results.
About:
Colin Shumate MS, CSCS, USAW is the Director of S&C at Crean Lutheran High School in Irvine, CA. Collaborate/questions/call him out at: shumate@creanlutheran.org